Tinkering with the ESP8266
A friend of mine showed me the ESP8266 and I just had to play with it. It’s sold as a serial-to-wifi module to Arduino but the firmware can be changed to do more. It’s also really cheap, about $2.20 from Aliexpress.
We flashed NodeMCU onto it and wrote some Lua code to connect to a wifi-AP and access a webpage. And it worked, most of the times at least. The stability and reliability isn’t really 100% currently, but hopefully it will be improved over time.
Connecting it
I haven’t got all the tools and power supplies yet so we had to do dirty hacks to get it to work. In order to use the chip, 3.3V and ground need to be connected to two pins each. A proper power supply and a bredboard would’ve done things easier but there’s always a way if you don’t have it.
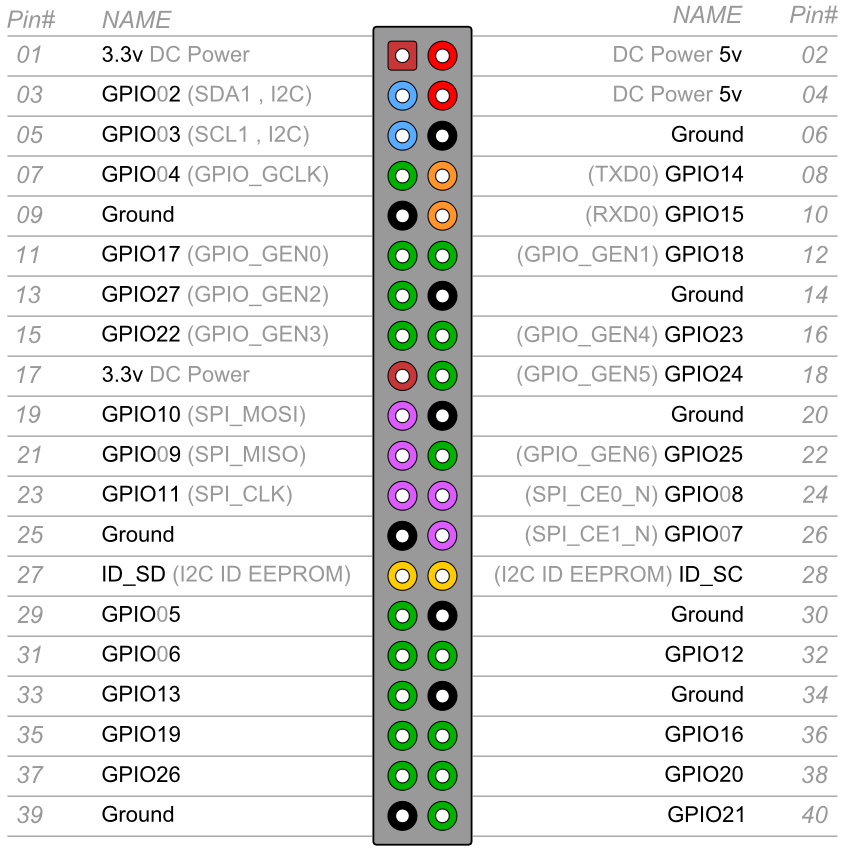
We found a dusty Raspberry Pi B and just used its 3.3 volt and ground pins. Good for us that there are multiple connectors.
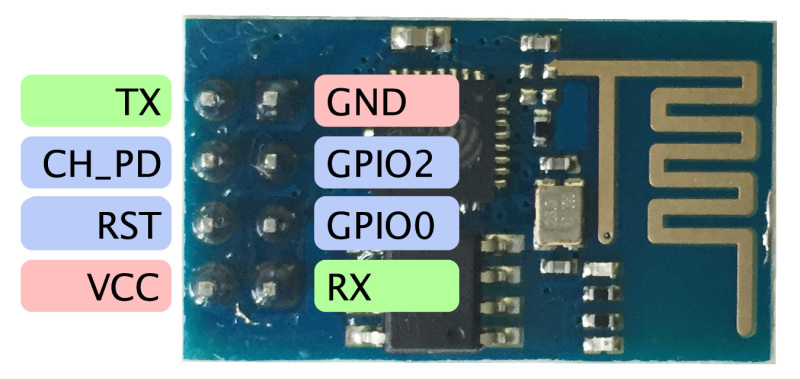
In order to use the chip, the following pins need to be connected:
+3.3V  => VCC
+3.3V  => CH_PD
GND    => GND
GND    => GPIO0 When flashing the firmware
A USB-to-serial is also needed. Make sure that it uses 3.3V. I used a PL2303HX, it’s pretty cheap. Connect it:
GND => GND
RX  => TX
TX  => RX
+5V => don't connect this :)
Code to access the web
After flashing NodeMCU, it’s time for some Lua scripting. It’s possible to just connect to the serial interface and just write code, but it gets really frustrating when your code grows, obviously.
There’s an IDE called esplorer that helps you out. It’s pretty basic and written in java, but it gets the job done. There’s also an AUR package for it so you can install it quickly if you run Arch.
|
|
My code works most of the time but not always. It’s probably because the firmware is still a bit buggy, but hopefully it will improve.
Pinout reference
Here are the pinout configurations for reference.
ESP8266

Raspberry PI B+. A and B only have 26 pins, they are the same. Source
